
A DIY home energy storage system installation is a big project. It's not just the batteries and inverters that you have to worry about, but also all the wiring, breaker panel upgrades and more. Fortunately, we've done most of this work for you! This post will get you up-to-speed on our e3dc installation process so that when it comes time for your install, your eyes will be wide open with excitement instead of dread and fear!
Don't Be Overwhelmed
As a DIYer, you may be tempted to think that installing the e3 dc Home Energy Storage System is difficult.
However, it's actually quite easy! The instructions are very clear and the whole process only takes about 45 minutes to complete.
The e3 is also designed with an optimized layout for installation in new homes or additions. That means it will fit perfectly into almost any residential setting!
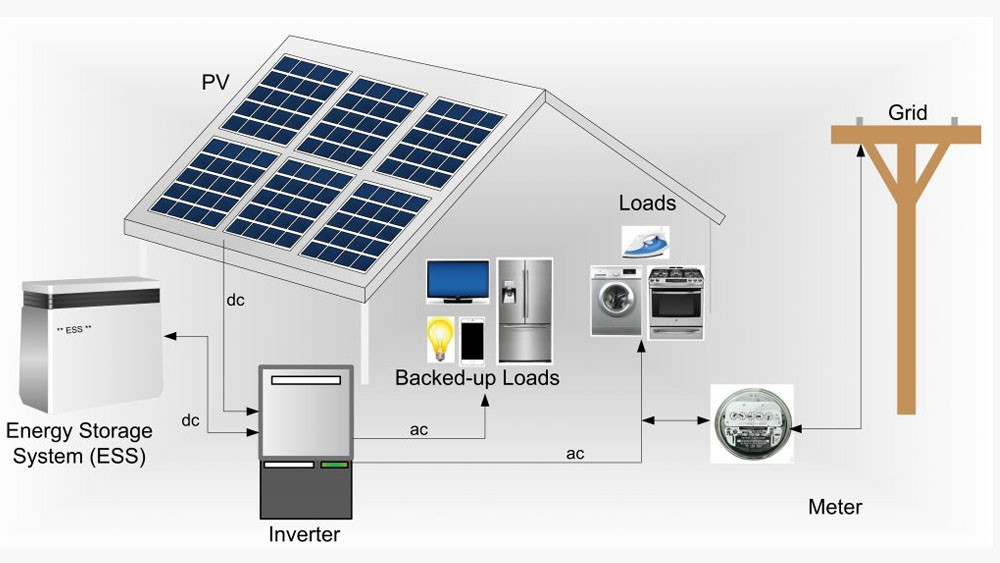
Prepare for the Storage System
Before you purchase a storage system, you should be sure that you have adequate space in your home for the device. If you don't have enough space and/or enough power to run it, then it will not work properly.
- Make sure you have enough room in your electrical panel to install the storage system (see image below)
- Check with an electrician if there are any doubts about whether or not it's safe or possible to install one there
Review the Storage System Instructions
Next, you will want to review the installation instructions. The e3 DC system comes with an installation guide that includes a parts list and step-by-step instructions for installing your battery energy storage system.
There are also supplemental documents available on the e3 site in case you need more specific instructions, such as:
- Solar Array Wiring Diagrams - these diagrams show you how to wire up your solar array to the inverter and then into the home’s electrical circuit breaker panel
- DC Open Circuit Voltage Transformers – these transformers are used to convert 240VAC down to 12VDC or 24VDC
Install the Battery Shut Off Switch
- Mark the location of the battery shut off switch. You can find this on your existing battery/inverter system as well.
- Drill holes for installing a new switch and make sure to take into account whether it will be mounted horizontally or vertically.
- Once you have drilled all holes, install all parts according to manufacturers' instructions and mount in place, making sure everything is connected securely.
Install the Inverter/Charger
Install the inverter/charger.
The inverter/charger is mounted on the e3 dc Home Energy Storage System's side wall, facing the right side of your home. Connect it to your electrical panel using a 10-foot pigtail and wire nuts. Then mount it to the wall using screws. The inverter/charger has three ports: one for connecting to AC power, one for connecting to DC power in case of an outage, and one for connecting to another device (such as your home's HVAC system).
Prepare the Electrical Panel and Prewire the System Components
Now that all of your components are in place, it's time to get them wired up. You'll need to prep your electrical panel for the installation by disconnecting and opening up the breakers that you plan on using for this system. Next, you'll prewire the battery cabinets, module and inverter by connecting them together in parallel. This means that you'll wire their positive leads together (the red or orange colored ones) then do the same for their negative leads (the black or blue colored ones). Once these connections are made, connect the battery cabinets to each other using two pairs of 4/0 gauge wire with ring terminals at both ends.
Once connected, review your work and make sure everything has been correctly installed before closing up your breakers again!
Connect the Battery Cabinets to your Breaker Panel, then to each other.
Now that the system is fully assembled, it's time to connect the battery cabinets to your breaker panel. You may need a professional electrician to do this step for you if you're not comfortable working with high voltage.
Connect the first cabinet in series between your breaker panel and the second cabinet, using either a neutral wire or an extra red wire (if necessary). Check that all connections are tight and secure; if they aren't, tighten them with pliers or screwdriver until they are snug but not overly tight.
Once both cabinets are connected in series, connect their positive terminals together using a thick black wire (or red/black combination if your batteries were wired in parallel). Again, check that everything is securely tightened before proceeding further with installation!
Review Your Work, Then Close Up Your Breakers.
You should now have a fully functional e3 dc Home Energy Storage System installed in your home! Congratulations!
When you’re done, check the work one last time. Look for:
- Loose wires. Make sure they are firmly connected to the batteries and controller.
- A tight connection (not loose), as well as a broken wire or missing connection (one that is disconnected). Check these with a multimeter if necessary by measuring each individual pair of wires, making sure they aren't too long or too short, and that there aren't any broken connections between them.
Check out this DIY home energy storage system installation guide.
If you've been thinking about installing a home energy storage system, this DIY guide will help. It's a great way to save money on your electricity bills and make your house more efficient. Installation is easy if you follow the instructions carefully and be sure to follow all safety instructions.
Conclusion
We know that installing your e3 dc Home Energy Storage System can be daunting, but with the right tools and a little help from us, we’re confident it will go smoothly. The best thing you can do is make sure you have everything ready before you start digging—that way, it won’t be difficult when the time comes to connect your panels together! Now that you’ve read through our guide on how to install an e3 dc Home Energy Storage System at home, feel free to bookmark this page for future reference; we hope it gives all new comers on their journey toward energy independence some peace of mind knowing they aren't alone in their quest.